
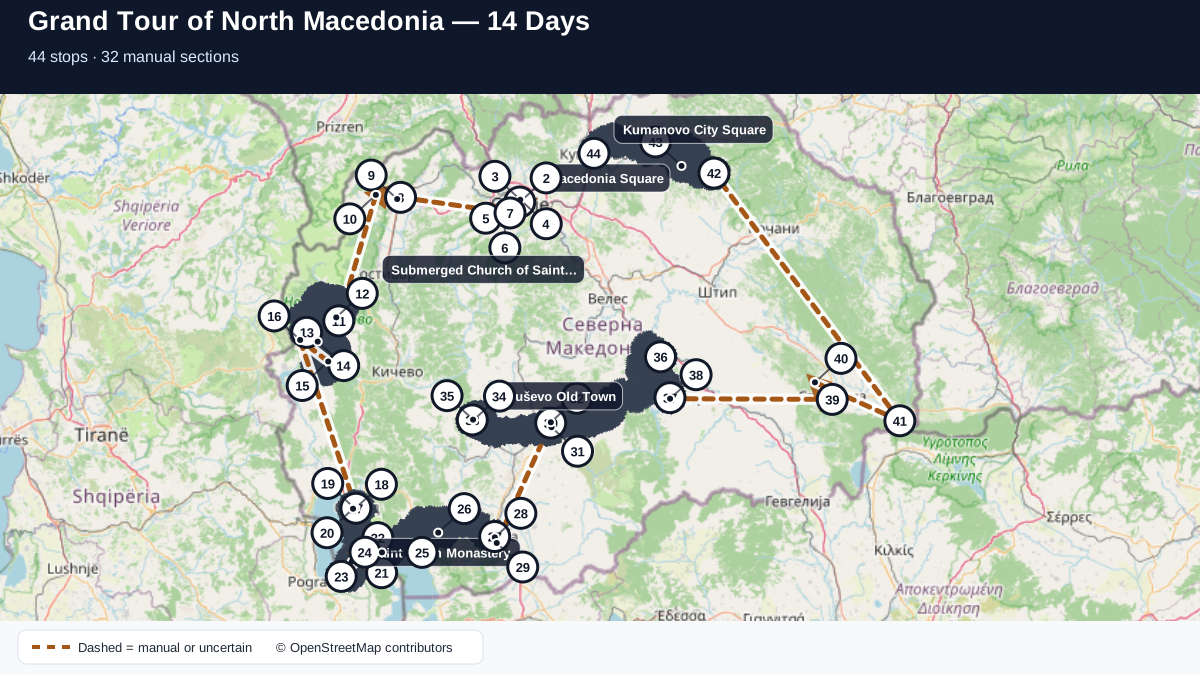
The trip, in order
Follow the route day by day. Times and prices can change, so check official information before you travel.
Skopje centre
Skopje
- 1
Macedonia Square
Choose Macedonia Square because it gives the Skopje City area a specific, recognisable experience rather than a generic map stop. Skopje’s principal civic square and the most direct orientation point for the central riverfront. The recommended 60-minute allowance covers the core visit, orientation and a realistic margin for interpretation, photographs or a rest. It works best when grouped with nearby places around Skopje so the trip avoids repeated parking searches, unnecessary valley crossings or rushed mountain transfers.
- Duration
- 60 minutes suggested
- Price
- Check current official information
- Start time
- Choose a start time that suits your day.
- 2
Stone Bridge
Choose Stone Bridge because it gives the Skopje City area a specific, recognisable experience rather than a generic map stop. The historic stone crossing that links Macedonia Square with the Old Bazaar. The recommended 30-minute allowance covers the core visit, orientation and a realistic margin for interpretation, photographs or a rest. It works best when grouped with nearby places around Skopje so the trip avoids repeated parking searches, unnecessary valley crossings or rushed mountain transfers.
- Duration
- 30 minutes suggested
- Price
- Check current official information
- Start time
- Choose a start time that suits your day.
- 3
Skopje Old Bazaar
Choose Skopje Old Bazaar because it gives the Skopje City area a specific, recognisable experience rather than a generic map stop. A large living bazaar of lanes, workshops, mosques, inns, museums and cafés. The recommended 150-minute allowance covers the core visit, orientation and a realistic margin for interpretation, photographs or a rest. It works best when grouped with nearby places around Skopje so the trip avoids repeated parking searches, unnecessary valley crossings or rushed mountain transfers.
- Duration
- 150 minutes suggested
- Price
- Check current official information
- Start time
- Choose a start time that suits your day.
- 4
Skopje Fortress Kale
Choose Skopje Fortress Kale because it gives the Skopje City area a specific, recognisable experience rather than a generic map stop. A hilltop fortress site with broad views over the Vardar and central Skopje. The recommended 75-minute allowance covers the core visit, orientation and a realistic margin for interpretation, photographs or a rest. It works best when grouped with nearby places around Skopje so the trip avoids repeated parking searches, unnecessary valley crossings or rushed mountain transfers.
- Duration
- 75 minutes suggested
- Price
- Check current official information
- Start time
- Choose a start time that suits your day.
Matka and Vodno
Matka
- 1
Matka Canyon
Choose Matka Canyon because it gives the Skopje Surroundings, Vodno and Matka area a specific, recognisable experience rather than a generic map stop. A steep limestone canyon and reservoir landscape popular for walking, kayaking and boat trips. The recommended 180-minute allowance covers the core visit, orientation and a realistic margin for interpretation, photographs or a rest. It works best when grouped with nearby places around Matka so the trip avoids repeated parking searches, unnecessary valley crossings or rushed mountain transfers.
- Duration
- 180 minutes suggested
- Price
- Check current official information
- Start time
- Choose a start time that suits your day.
- 2
Church of Saint Panteleimon at Nerezi
Choose Church of Saint Panteleimon at Nerezi because it gives the Skopje Surroundings, Vodno and Matka area a specific, recognisable experience rather than a generic map stop. A major Byzantine church whose twelfth-century frescoes are internationally important. The recommended 60-minute allowance covers the core visit, orientation and a realistic margin for interpretation, photographs or a rest. It works best when grouped with nearby places around Gorno Nerezi so the trip avoids repeated parking searches, unnecessary valley crossings or rushed mountain transfers.
- Duration
- 60 minutes suggested
- Price
- Check current official information
- Start time
- Choose a start time that suits your day.
- 3
Millennium Cross
Choose Millennium Cross because it gives the Skopje Surroundings, Vodno and Matka area a specific, recognisable experience rather than a generic map stop. A monumental cross on Vodno with extensive views over Skopje and the surrounding mountains. The recommended 120-minute allowance covers the core visit, orientation and a realistic margin for interpretation, photographs or a rest. It works best when grouped with nearby places around Skopje so the trip avoids repeated parking searches, unnecessary valley crossings or rushed mountain transfers.
- Duration
- 120 minutes suggested
- Price
- Check current official information
- Start time
- Choose a start time that suits your day.
Tetovo and Šar
Tetovo
- 1
Šarena Džamija Painted Mosque
Choose Šarena Džamija Painted Mosque because it gives the Polog Valley and Šar Mountain area a specific, recognisable experience rather than a generic map stop. Tetovo’s celebrated painted mosque, covered with colourful floral and architectural decoration. The recommended 60-minute allowance covers the core visit, orientation and a realistic margin for interpretation, photographs or a rest. It works best when grouped with nearby places around Tetovo so the trip avoids repeated parking searches, unnecessary valley crossings or rushed mountain transfers.
- Duration
- 60 minutes suggested
- Price
- Check current official information
- Start time
- Choose a start time that suits your day.
- 2
Arabati Baba Tekke
Choose Arabati Baba Tekke because it gives the Polog Valley and Šar Mountain area a specific, recognisable experience rather than a generic map stop. A large Bektashi dervish complex with courtyards, pavilions and a long spiritual history. The recommended 75-minute allowance covers the core visit, orientation and a realistic margin for interpretation, photographs or a rest. It works best when grouped with nearby places around Tetovo so the trip avoids repeated parking searches, unnecessary valley crossings or rushed mountain transfers.
- Duration
- 75 minutes suggested
- Price
- Check current official information
- Start time
- Choose a start time that suits your day.
- 3
Popova Šapka Mountain Resort
Choose Popova Šapka Mountain Resort because it gives the Polog Valley and Šar Mountain area a specific, recognisable experience rather than a generic map stop. The main developed mountain resort on the Šar range, used for skiing and summer access. The recommended 180-minute allowance covers the core visit, orientation and a realistic margin for interpretation, photographs or a rest. It works best when grouped with nearby places around Popova Šapka so the trip avoids repeated parking searches, unnecessary valley crossings or rushed mountain transfers.
- Duration
- 180 minutes suggested
- Price
- Check current official information
- Start time
- Choose a start time that suits your day.
Mavrovo and Bigorski
Mavrovo
- 1
Mavrovo Lake
Choose Mavrovo Lake because it gives the Mavrovo National Park and the Reka Villages area a specific, recognisable experience rather than a generic map stop. The central reservoir and settlement landscape of Mavrovo National Park. The recommended 120-minute allowance covers the core visit, orientation and a realistic margin for interpretation, photographs or a rest. It works best when grouped with nearby places around Mavrovo so the trip avoids repeated parking searches, unnecessary valley crossings or rushed mountain transfers.
- Duration
- 120 minutes suggested
- Price
- Check current official information
- Start time
- Choose a start time that suits your day.
- 2
Submerged Church of Saint Nicholas
Choose Submerged Church of Saint Nicholas because it gives the Mavrovo National Park and the Reka Villages area a specific, recognisable experience rather than a generic map stop. A partially submerged church that has become the defining image of Lake Mavrovo. The recommended 45-minute allowance covers the core visit, orientation and a realistic margin for interpretation, photographs or a rest. It works best when grouped with nearby places around Mavrovo so the trip avoids repeated parking searches, unnecessary valley crossings or rushed mountain transfers.
- Duration
- 45 minutes suggested
- Price
- Check current official information
- Start time
- Choose a start time that suits your day.
- 3
Saint Jovan Bigorski Monastery
Choose Saint Jovan Bigorski Monastery because it gives the Mavrovo National Park and the Reka Villages area a specific, recognisable experience rather than a generic map stop. A spectacularly sited monastery famous for its iconostasis and spiritual life. The recommended 90-minute allowance covers the core visit, orientation and a realistic margin for interpretation, photographs or a rest. It works best when grouped with nearby places around Bigorski so the trip avoids repeated parking searches, unnecessary valley crossings or rushed mountain transfers.
- Duration
- 90 minutes suggested
- Price
- Check current official information
- Start time
- Choose a start time that suits your day.
Mijak villages
Reka
- 1
Galičnik Village
Choose Galičnik Village because it gives the Mavrovo National Park and the Reka Villages area a specific, recognisable experience rather than a generic map stop. A high traditional village celebrated for stone houses, pastoral culture and the annual wedding festival. The recommended 150-minute allowance covers the core visit, orientation and a realistic margin for interpretation, photographs or a rest. It works best when grouped with nearby places around Galičnik so the trip avoids repeated parking searches, unnecessary valley crossings or rushed mountain transfers.
- Duration
- 150 minutes suggested
- Price
- Check current official information
- Start time
- Choose a start time that suits your day.
- 2
Lazaropole Village
Choose Lazaropole Village because it gives the Mavrovo National Park and the Reka Villages area a specific, recognisable experience rather than a generic map stop. A broad mountain village with stone houses, meadows and quiet walking routes. The recommended 120-minute allowance covers the core visit, orientation and a realistic margin for interpretation, photographs or a rest. It works best when grouped with nearby places around Lazaropole so the trip avoids repeated parking searches, unnecessary valley crossings or rushed mountain transfers.
- Duration
- 120 minutes suggested
- Price
- Check current official information
- Start time
- Choose a start time that suits your day.
- 3
Duf Waterfall
Choose Duf Waterfall because it gives the Mavrovo National Park and the Reka Villages area a specific, recognisable experience rather than a generic map stop. A forest waterfall reached by a signed trail from Rostuše. The recommended 150-minute allowance covers the core visit, orientation and a realistic margin for interpretation, photographs or a rest. It works best when grouped with nearby places around Rostuše so the trip avoids repeated parking searches, unnecessary valley crossings or rushed mountain transfers.
- Duration
- 150 minutes suggested
- Price
- Check current official information
- Start time
- Choose a start time that suits your day.
Ohrid old town
Ohrid
- 1
Ohrid Old Town
Choose Ohrid Old Town because it gives the Ohrid City and Lake Shore area a specific, recognisable experience rather than a generic map stop. A compact UNESCO-listed townscape of churches, houses, lanes and lake views. The recommended 180-minute allowance covers the core visit, orientation and a realistic margin for interpretation, photographs or a rest. It works best when grouped with nearby places around Ohrid so the trip avoids repeated parking searches, unnecessary valley crossings or rushed mountain transfers.
- Duration
- 180 minutes suggested
- Price
- Check current official information
- Start time
- Choose a start time that suits your day.
- 2
Church of Saint Sophia
Choose Church of Saint Sophia because it gives the Ohrid City and Lake Shore area a specific, recognisable experience rather than a generic map stop. One of Ohrid’s most important churches, preserving major medieval fresco cycles. The recommended 75-minute allowance covers the core visit, orientation and a realistic margin for interpretation, photographs or a rest. It works best when grouped with nearby places around Ohrid so the trip avoids repeated parking searches, unnecessary valley crossings or rushed mountain transfers.
- Duration
- 75 minutes suggested
- Price
- Check current official information
- Start time
- Choose a start time that suits your day.
- 3
Samuel's Fortress
Choose Samuel's Fortress because it gives the Ohrid City and Lake Shore area a specific, recognisable experience rather than a generic map stop. A fortified hilltop circuit offering the broadest view over Ohrid and the lake. The recommended 75-minute allowance covers the core visit, orientation and a realistic margin for interpretation, photographs or a rest. It works best when grouped with nearby places around Ohrid so the trip avoids repeated parking searches, unnecessary valley crossings or rushed mountain transfers.
- Duration
- 75 minutes suggested
- Price
- Check current official information
- Start time
- Choose a start time that suits your day.
- 4
Church of Saint John at Kaneo
Choose Church of Saint John at Kaneo because it gives the Ohrid City and Lake Shore area a specific, recognisable experience rather than a generic map stop. Ohrid’s iconic cliff-edge church above Lake Ohrid. The recommended 60-minute allowance covers the core visit, orientation and a realistic margin for interpretation, photographs or a rest. It works best when grouped with nearby places around Ohrid so the trip avoids repeated parking searches, unnecessary valley crossings or rushed mountain transfers.
- Duration
- 60 minutes suggested
- Price
- Check current official information
- Start time
- Choose a start time that suits your day.
South lake
Sveti Naum
- 1
Bay of Bones Museum
Choose Bay of Bones Museum because it gives the Ohrid City and Lake Shore area a specific, recognisable experience rather than a generic map stop. A reconstructed pile-dwelling settlement above Lake Ohrid with an archaeological display. The recommended 90-minute allowance covers the core visit, orientation and a realistic margin for interpretation, photographs or a rest. It works best when grouped with nearby places around Gradishte so the trip avoids repeated parking searches, unnecessary valley crossings or rushed mountain transfers.
- Duration
- 90 minutes suggested
- Price
- Check current official information
- Start time
- Choose a start time that suits your day.
- 2
Trpejca Village
Choose Trpejca Village because it gives the Ohrid City and Lake Shore area a specific, recognisable experience rather than a generic map stop. A steep lakeside village with clear water, small beaches and fishing traditions. The recommended 150-minute allowance covers the core visit, orientation and a realistic margin for interpretation, photographs or a rest. It works best when grouped with nearby places around Trpejca so the trip avoids repeated parking searches, unnecessary valley crossings or rushed mountain transfers.
- Duration
- 150 minutes suggested
- Price
- Check current official information
- Start time
- Choose a start time that suits your day.
- 3
Saint Naum Monastery
Choose Saint Naum Monastery because it gives the Ohrid City and Lake Shore area a specific, recognisable experience rather than a generic map stop. A major monastery complex beside the springs at the southern end of Lake Ohrid. The recommended 120-minute allowance covers the core visit, orientation and a realistic margin for interpretation, photographs or a rest. It works best when grouped with nearby places around Sveti Naum so the trip avoids repeated parking searches, unnecessary valley crossings or rushed mountain transfers.
- Duration
- 120 minutes suggested
- Price
- Check current official information
- Start time
- Choose a start time that suits your day.
Galičica and Prespa
Prespa
- 1
Galičica National Park
Choose Galičica National Park because it gives the Prespa and Galičica area a specific, recognisable experience rather than a generic map stop. The mountain national park separating Lake Ohrid from Lake Prespa. The recommended 180-minute allowance covers the core visit, orientation and a realistic margin for interpretation, photographs or a rest. It works best when grouped with nearby places around Ohrid so the trip avoids repeated parking searches, unnecessary valley crossings or rushed mountain transfers.
- Duration
- 180 minutes suggested
- Price
- Check current official information
- Start time
- Choose a start time that suits your day.
- 2
Lake Prespa at Oteševo
Choose Lake Prespa at Oteševo because it gives the Prespa and Galičica area a specific, recognisable experience rather than a generic map stop. An accessible Prespa shoreline with wide views and a quieter atmosphere than Lake Ohrid. The recommended 120-minute allowance covers the core visit, orientation and a realistic margin for interpretation, photographs or a rest. It works best when grouped with nearby places around Oteševo so the trip avoids repeated parking searches, unnecessary valley crossings or rushed mountain transfers.
- Duration
- 120 minutes suggested
- Price
- Check current official information
- Start time
- Choose a start time that suits your day.
- 3
Church of Saint George Kurbinovo
Choose Church of Saint George Kurbinovo because it gives the Prespa and Galičica area a specific, recognisable experience rather than a generic map stop. A small rural church containing one of the region’s most important twelfth-century fresco ensembles. The recommended 60-minute allowance covers the core visit, orientation and a realistic margin for interpretation, photographs or a rest. It works best when grouped with nearby places around Kurbinovo so the trip avoids repeated parking searches, unnecessary valley crossings or rushed mountain transfers.
- Duration
- 60 minutes suggested
- Price
- Check current official information
- Start time
- Choose a start time that suits your day.
Bitola and Heraclea
Bitola
- 1
Širok Sokak
Choose Širok Sokak because it gives the Bitola and Pelister area a specific, recognisable experience rather than a generic map stop. Bitola’s elegant pedestrian boulevard, lined with consular-era façades and cafés. The recommended 120-minute allowance covers the core visit, orientation and a realistic margin for interpretation, photographs or a rest. It works best when grouped with nearby places around Bitola so the trip avoids repeated parking searches, unnecessary valley crossings or rushed mountain transfers.
- Duration
- 120 minutes suggested
- Price
- Check current official information
- Start time
- Choose a start time that suits your day.
- 2
NI Institute and Museum Bitola
Choose NI Institute and Museum Bitola because it gives the Bitola and Pelister area a specific, recognisable experience rather than a generic map stop. Bitola’s principal museum inside the former military academy. The recommended 90-minute allowance covers the core visit, orientation and a realistic margin for interpretation, photographs or a rest. It works best when grouped with nearby places around Bitola so the trip avoids repeated parking searches, unnecessary valley crossings or rushed mountain transfers.
- Duration
- 90 minutes suggested
- Price
- Check current official information
- Start time
- Choose a start time that suits your day.
- 3
Heraclea Lyncestis
Choose Heraclea Lyncestis because it gives the Bitola and Pelister area a specific, recognisable experience rather than a generic map stop. A major ancient city site noted for its theatre and early Christian mosaics. The recommended 120-minute allowance covers the core visit, orientation and a realistic margin for interpretation, photographs or a rest. It works best when grouped with nearby places around Bitola so the trip avoids repeated parking searches, unnecessary valley crossings or rushed mountain transfers.
- Duration
- 120 minutes suggested
- Price
- Check current official information
- Start time
- Choose a start time that suits your day.
Prilep granite heritage
Prilep
- 1
Marko's Towers Markovi Kuli
Choose Marko's Towers Markovi Kuli because it gives the Prilep and Mariovo area a specific, recognisable experience rather than a generic map stop. A dramatic granite hill and medieval fortress complex above Prilep. The recommended 180-minute allowance covers the core visit, orientation and a realistic margin for interpretation, photographs or a rest. It works best when grouped with nearby places around Prilep so the trip avoids repeated parking searches, unnecessary valley crossings or rushed mountain transfers.
- Duration
- 180 minutes suggested
- Price
- Check current official information
- Start time
- Choose a start time that suits your day.
- 2
Prilep Old Bazaar
Choose Prilep Old Bazaar because it gives the Prilep and Mariovo area a specific, recognisable experience rather than a generic map stop. A compact market quarter with shops, food and surviving historic fabric. The recommended 90-minute allowance covers the core visit, orientation and a realistic margin for interpretation, photographs or a rest. It works best when grouped with nearby places around Prilep so the trip avoids repeated parking searches, unnecessary valley crossings or rushed mountain transfers.
- Duration
- 90 minutes suggested
- Price
- Check current official information
- Start time
- Choose a start time that suits your day.
- 3
Monastery of Archangel Michael Varosh
Choose Monastery of Archangel Michael Varosh because it gives the Prilep and Mariovo area a specific, recognisable experience rather than a generic map stop. A monastery built into the granite slopes below Marko’s Towers. The recommended 75-minute allowance covers the core visit, orientation and a realistic margin for interpretation, photographs or a rest. It works best when grouped with nearby places around Prilep so the trip avoids repeated parking searches, unnecessary valley crossings or rushed mountain transfers.
- Duration
- 75 minutes suggested
- Price
- Check current official information
- Start time
- Choose a start time that suits your day.
Kruševo
Kruševo
- 1
Kruševo Old Town
Choose Kruševo Old Town because it gives the Kruševo and Demir Hisar area a specific, recognisable experience rather than a generic map stop. North Macedonia’s highest town, known for steep streets and distinctive nineteenth-century houses. The recommended 150-minute allowance covers the core visit, orientation and a realistic margin for interpretation, photographs or a rest. It works best when grouped with nearby places around Kruševo so the trip avoids repeated parking searches, unnecessary valley crossings or rushed mountain transfers.
- Duration
- 150 minutes suggested
- Price
- Check current official information
- Start time
- Choose a start time that suits your day.
- 2
Makedonium Ilinden Monument
Choose Makedonium Ilinden Monument because it gives the Kruševo and Demir Hisar area a specific, recognisable experience rather than a generic map stop. A monumental modernist memorial to the 1903 Ilinden Uprising and Kruševo Republic. The recommended 90-minute allowance covers the core visit, orientation and a realistic margin for interpretation, photographs or a rest. It works best when grouped with nearby places around Kruševo so the trip avoids repeated parking searches, unnecessary valley crossings or rushed mountain transfers.
- Duration
- 90 minutes suggested
- Price
- Check current official information
- Start time
- Choose a start time that suits your day.
- 3
Toše Proeski Memorial House
Choose Toše Proeski Memorial House because it gives the Kruševo and Demir Hisar area a specific, recognisable experience rather than a generic map stop. A contemporary memorial museum for the popular singer Toše Proeski. The recommended 75-minute allowance covers the core visit, orientation and a realistic margin for interpretation, photographs or a rest. It works best when grouped with nearby places around Kruševo so the trip avoids repeated parking searches, unnecessary valley crossings or rushed mountain transfers.
- Duration
- 75 minutes suggested
- Price
- Check current official information
- Start time
- Choose a start time that suits your day.
Stobi and Tikveš
Stobi
- 1
Stobi Archaeological Site
Choose Stobi Archaeological Site because it gives the Vardar Valley and Tikveš area a specific, recognisable experience rather than a generic map stop. North Macedonia’s largest excavated ancient city, positioned at a major river and road junction. The recommended 150-minute allowance covers the core visit, orientation and a realistic margin for interpretation, photographs or a rest. It works best when grouped with nearby places around Gradsko so the trip avoids repeated parking searches, unnecessary valley crossings or rushed mountain transfers.
- Duration
- 150 minutes suggested
- Price
- Check current official information
- Start time
- Choose a start time that suits your day.
- 2
Kavadarci Wine Museum
Choose Kavadarci Wine Museum because it gives the Vardar Valley and Tikveš area a specific, recognisable experience rather than a generic map stop. A local museum introducing the history of Tikveš viticulture and winemaking. The recommended 60-minute allowance covers the core visit, orientation and a realistic margin for interpretation, photographs or a rest. It works best when grouped with nearby places around Kavadarci so the trip avoids repeated parking searches, unnecessary valley crossings or rushed mountain transfers.
- Duration
- 60 minutes suggested
- Price
- Check current official information
- Start time
- Choose a start time that suits your day.
- 3
Tikveš Winery Visitor Centre
Choose Tikveš Winery Visitor Centre because it gives the Vardar Valley and Tikveš area a specific, recognisable experience rather than a generic map stop. A major winery experience in the heart of North Macedonia’s principal wine region. The recommended 120-minute allowance covers the core visit, orientation and a realistic margin for interpretation, photographs or a rest. It works best when grouped with nearby places around Kavadarci so the trip avoids repeated parking searches, unnecessary valley crossings or rushed mountain transfers.
- Duration
- 120 minutes suggested
- Price
- Check current official information
- Start time
- Choose a start time that suits your day.
Strumica and waterfalls
Strumica
- 1
Carevi Kuli Strumica Fortress
Choose Carevi Kuli Strumica Fortress because it gives the Strumica, Belasica and Dojran area a specific, recognisable experience rather than a generic map stop. A fortified hill above Strumica with wide views over the valley. The recommended 120-minute allowance covers the core visit, orientation and a realistic margin for interpretation, photographs or a rest. It works best when grouped with nearby places around Strumica so the trip avoids repeated parking searches, unnecessary valley crossings or rushed mountain transfers.
- Duration
- 120 minutes suggested
- Price
- Check current official information
- Start time
- Choose a start time that suits your day.
- 2
Veljusa Monastery of the Holy Mother of God Eleusa
Choose Veljusa Monastery of the Holy Mother of God Eleusa because it gives the Strumica, Belasica and Dojran area a specific, recognisable experience rather than a generic map stop. An eleventh-century monastery church with important architecture and painting. The recommended 75-minute allowance covers the core visit, orientation and a realistic margin for interpretation, photographs or a rest. It works best when grouped with nearby places around Veljusa so the trip avoids repeated parking searches, unnecessary valley crossings or rushed mountain transfers.
- Duration
- 75 minutes suggested
- Price
- Check current official information
- Start time
- Choose a start time that suits your day.
- 3
Smolare Waterfall
Choose Smolare Waterfall because it gives the Strumica, Belasica and Dojran area a specific, recognisable experience rather than a generic map stop. The country’s highest permanent waterfall, reached by a developed forest path. The recommended 150-minute allowance covers the core visit, orientation and a realistic margin for interpretation, photographs or a rest. It works best when grouped with nearby places around Smolare so the trip avoids repeated parking searches, unnecessary valley crossings or rushed mountain transfers.
- Duration
- 150 minutes suggested
- Price
- Check current official information
- Start time
- Choose a start time that suits your day.
Return through the northeast
Skopje
- 1
Kratovo Stone Bridges
Choose Kratovo Stone Bridges because it gives the Kumanovo, Kratovo and the Northeast area a specific, recognisable experience rather than a generic map stop. A network of historic stone bridges crossing the deeply cut streams of Kratovo. The recommended 90-minute allowance covers the core visit, orientation and a realistic margin for interpretation, photographs or a rest. It works best when grouped with nearby places around Kratovo so the trip avoids repeated parking searches, unnecessary valley crossings or rushed mountain transfers.
- Duration
- 90 minutes suggested
- Price
- Check current official information
- Start time
- Choose a start time that suits your day.
- 2
Kuklica Stone Dolls
Choose Kuklica Stone Dolls because it gives the Kumanovo, Kratovo and the Northeast area a specific, recognisable experience rather than a generic map stop. A field of eroded stone pillars surrounded by local wedding legends. The recommended 75-minute allowance covers the core visit, orientation and a realistic margin for interpretation, photographs or a rest. It works best when grouped with nearby places around Kuklica so the trip avoids repeated parking searches, unnecessary valley crossings or rushed mountain transfers.
- Duration
- 75 minutes suggested
- Price
- Check current official information
- Start time
- Choose a start time that suits your day.
- 3
Kumanovo City Square
Choose Kumanovo City Square because it gives the Kumanovo, Kratovo and the Northeast area a specific, recognisable experience rather than a generic map stop. The central public space of North Macedonia’s second-largest urban area. The recommended 60-minute allowance covers the core visit, orientation and a realistic margin for interpretation, photographs or a rest. It works best when grouped with nearby places around Kumanovo so the trip avoids repeated parking searches, unnecessary valley crossings or rushed mountain transfers.
- Duration
- 60 minutes suggested
- Price
- Check current official information
- Start time
- Choose a start time that suits your day.